> ## Documentation Index
> Fetch the complete documentation index at: https://docs.cogfy.com/llms.txt
> Use this file to discover all available pages before exploring further.
# Quickstart
> Create your first WhatsApp AI Agent in a few minutes
## Get started in three steps
Create your first WhatsApp AI assistant in just a few minutes by following these simple steps:
### Step 1: Create account and set up workspace
1. Go to [messenger.cogfy.com/sign-in](https://messenger.cogfy.com/sign-in) and create your account.
2. Verify your email address.
3. Log in to your new account and create a workspace for your project.
After creating your account, set up your first workspace
On [profile page](https://messenger.cogfy.com/profile), click "Create Workspace", provide a name, and click "Create".
 ### Step 2: Add new phone number
You can add a new phone number in three ways: by getting a phone number provided by Cogfy, by bringing your own existing phone number to use with Cogfy, or by connecting a WhatsApp Business App number in coexistence mode.
Each option has its own setup process, allowing you to choose the method that best fits your needs.
> To connect your phone number, visit [messenger.cogfy.com/:WORKSPACE/new-phone-number](https://messenger.cogfy.com/:WORKSPACE/new-phone-number).
### Step 2: Add new phone number
You can add a new phone number in three ways: by getting a phone number provided by Cogfy, by bringing your own existing phone number to use with Cogfy, or by connecting a WhatsApp Business App number in coexistence mode.
Each option has its own setup process, allowing you to choose the method that best fits your needs.
> To connect your phone number, visit [messenger.cogfy.com/:WORKSPACE/new-phone-number](https://messenger.cogfy.com/:WORKSPACE/new-phone-number).
 ### Step 3: Create a workflow and connect it to your phone number
Workflows are how you build AI-powered automations in Cogfy Messenger. Navigate to the Workflows route and create a new workflow, then add nodes to define how it should respond to incoming messages.
Follow the [first workflow tutorial](/guide/workflows/tutorial-first-workflow) for a step-by-step walkthrough of building an AI assistant powered workflow.
After creating and publishing your workflow, you need to link it to your WhatsApp phone number to enable messaging capabilities.
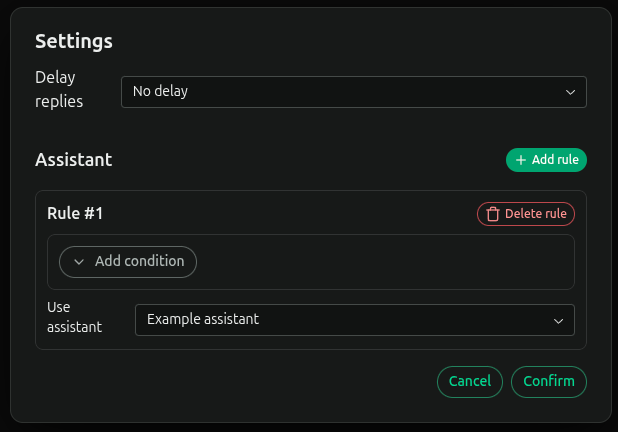
Go to the Phone Numbers route, select your phone number, and setup a rule to connect it to your newly created workflow.
### Step 3: Create a workflow and connect it to your phone number
Workflows are how you build AI-powered automations in Cogfy Messenger. Navigate to the Workflows route and create a new workflow, then add nodes to define how it should respond to incoming messages.
Follow the [first workflow tutorial](/guide/workflows/tutorial-first-workflow) for a step-by-step walkthrough of building an AI assistant powered workflow.
After creating and publishing your workflow, you need to link it to your WhatsApp phone number to enable messaging capabilities.
Go to the Phone Numbers route, select your phone number, and setup a rule to connect it to your newly created workflow.
 ## Send your first message
Now that your WhatsApp AI assistant is set up and connected to your phone number, you can send your first message!
## Next steps
Now that you have your first WhatsApp AI assistant up and running, explore these guides to enhance its capabilities:
Configure your WhatsApp phone profile details.
Extend your assistant's capabilities with more workflow nodes.
Monitor your usage and understand billing.
## Send your first message
Now that your WhatsApp AI assistant is set up and connected to your phone number, you can send your first message!
## Next steps
Now that you have your first WhatsApp AI assistant up and running, explore these guides to enhance its capabilities:
Configure your WhatsApp phone profile details.
Extend your assistant's capabilities with more workflow nodes.
Monitor your usage and understand billing.